# Introduction
Learn about ChainSwap and it's vision.
ChainSwap is the hub for all smart chains
ChainSwap is a cross-chain asset bridge & application hub for smart chains. ChainSwap allows projects to seamlessly bridge between blockchains.
## **The four pillars of ChainSwap:**
**Asset:**\
ChainSwap aims to create a multi-chain and multi-asset solution for multiple scenarios. For example, currently there are no proper decentralized solutions for swapping your assets across chains. Binance bridge offers a swap limit of $10,000 per wallet, ChainSwap will have a higher limit. DeFi has evolved from being solely on Ethereum to being on almost every infrastructure and L2 chain. ChainSwap is helping DeFi evolution and scaling by making asset swaps seamless.
ChainSwap will offer seamless asset onboarding meaning anyone can make a token cross chain by following a simple deployment procedure. New tokens can also be made cross chain from creation.
**Application:** ChainSwap aims to offer cross-chain applications by ultimately connecting all chains into one. This solution will provide unique opportunities in the DeFi space while giving DeFi access to a broader audience. Lending, Borrowing, Cross-Chain swaps and more.
**Agency:** Node based agency network fulfills cross-chain requests like gas payments across chains while minimizing application runtime.\
\
**Intermediary Chain:** The hub for all chains, ultimately ChainSwap will create an intermediary chain that enables cross-chain functionalities. Imagine a smart chain with all the chains in the underlying infrastructure, deploying on ChainSwap will grant you access to all the underlying chains. In addition, TOKEN will be the main token.
# Ideology
## Competition and collaboration:
Back in 2017, everyone was overwhelmed by public chains. The deal lists of many investors were full of different types of public chains. People discussed the pros and cons of different consensus mechanisms. A single design of consensus mechanism could bring its creators millions of dollars. No one knew or even cared whether people would use the public chains. I call this period of time: “competition of air”.
Between 2018 and 2019, projects that raised a lot of money started to realize their public chain dream. The word “mainnet” could pump public chain tokens by 100%. But people gradually realized that it is not about consensus, but about whether players in the industry would love to get involved and play with the consensus. The “better than Ethereum” dream was destroyed again and again until people started to hate the very idea of consensus. Most public chains ended up being held and operated by project teams themselves using distributed nodes. I call this period of time: “competition of substance”.
In 2020, the rise of defi emphasized the importance of Ethereum. Before people liked Ethereum because it was the mother of ICO and “moon and lambo” dream, this time many people actually started to USE ethereum for farming and playing with defi. The solid infrastructure proved that ethereum is the most solid chain for development. Most people are addicted to Ethereum and the level of addiction is so high that people did not even want to download a wallet from other public chains or even talk about other chains. I call this period “the era of monopoly”.
Living in this addictive monopoly environment, people in power started to seek other ways of making money. This time they started to embrace Ethereum technology to the extent that they just mimicked (or let’s just call it copy) Ethereum and named their chain “smart chain”. Those people are smart. Their real selling point is: cheap and fast. Yes, smart chains are cheap and fast. The golden rule for them is “fuck decentralization” since centralization brings cheap and fast experience. Players in Ethereum can easily get onto smart chains and operate the same ways they do on Ethereum. I call this period “the era of compromise”.
Now what? Let me ask you one question: do you think people would really get onto those smart chains and abandon Ethereum? Of course not. Humans have never abandoned something that is addictive in the entire civ
ilization (I do not need to give you some illegal examples). What most people do is they use smart chains to complete some of the tasks and move things back to Ethereum in the end. Psychologically, Ethereum is a safe hub even though it is expensive and all smart chains are adventures. (Forgive me for making an inappropriate example: it is just like a married man looking at or … other girls on the street. Human nature). If such behavior keeps happening, we need a smarter move: we need a solution to provide fast and smooth transportation between Ethereum and smart chains (I call all EVM-compatible chains smart chains). It is no longer about competition, it is now about cooperation. Now, it is the right time to introduce Chainswap: the hub for all smart chains from assets to applications.
## User experience
You probably think I am BS here, since Chainswap is an infrastructure project and I am putting technology after user experience. But let me ask you some questions:
1. Ethereum was not the most decentralized solution among all public chains. Is there any public chain that is more successful than Ethereum now?
2. Uniswap was not the only DEX when it started. Is there any DEX that is more successful than Uniswap?
3. (To make my point even more clear) Apple did not have the best technology back in the day. How about now?
Ethereum has the best developer environment in this space and Uniswap has the best user interactions and user experiences among all defi. Technology supports the best user experience and it is not supposed to be a rocket science only the founder knows what it is.
There are many existing cross chain solutions and many of them look very impressive. However, the ideology of Chainswap is to provide the most user-friendly cross chain experience. Decentralization is a comparative subject and we will pursue a more decentralized approach for Chainswap, but providing something for masses to use is our key mission.
The very first product of Chainswap is cross chain asset: [https://chainswap.com](https://chainswap.com/). We mimic the user flow to make it extremely similar to Uniswap. The reasoning is simple: A user of Chainswap exchange should have used Uniswap before and he can use the same experience to cross chain assets. It largely reduces the learning effort for a new product.
To summarize in one sentence: respect users and you will be the winner.
## Implementation
In my opinion, we have passed the era where a project needs a long white paper to be qualified as a legit and trustworthy project. It is not difficult to hire an academic person or even professor to draft a white paper that is full or fancy theory. We are in the era of execution and implementation. The market is dynamic and the client characteristics are not standardized. To adapt to such a market, we need to experiment and gain experience along with project development. Along with cross chain assets, we figured out many specific demands from projects and we keep improving features.
In terms of roadmap, the vague view is three steps: asset, application and agency:
Asset: the name speaks to itself. We are currently working on this part and the first iteration of the product is launched. There are many ways of cross chain assets because there are many scenarios: 1) new projects with non-issued assets 2) existing projects with only Ethereum-issued assets 3) existing projects with assets issued on all chains. The cross chain solution to handle different scenarios are different. I want to emphasize that the cross chain asset solution is not a rocket science since many projects have been revealed and there is no big difference.
Application: When assets are cross chain, the next step is very straightforward. To make a simple cross chain application example, you can earn compound interest rates from your assets on Binance Smart Chain. Imagine being able to apply cross chain to all defi applications.
Agency: There are many cases when users do not have cross chain wallets or gas to pay for on chain activities on other smart chains. As a result, we need agencies in the network to provide those types of services. These agencies are node operators who have a money incentive for acquiring fees. There are two main use cases for agency: 1) You do not have a wallet on other chains and you need to conduct defi activities or use assets. Agencies can create a mirror smart contract wallet for you to facilitate. 2) Agents pay gas for you. Agency activities vary from cross chain assets to cross application.
## Smart City of Smart Chain
If you have ever learnt human geography or urban economics, you know the theory of a formation of a major city: You need a place where two important roads or rivers cross each other. Then you have two lines of traffic meeting there. Services such as hotels and restaurants start to open to serve the people who stop by. Then businesses attract more people and expand. The place grows from a town to a city.
What Chainswap is doing is the very first step, which is cross chain. But assets never live or stay on Chainswap as of now. However, when more people use Chainswap and more assets flow around Chainswap, some capital will be deposited and live on Chainswap for a longer period of time. So more Chainswap infrastructure services can be created to service the capital. We can expand from swap to interest earning.
The final goal is to build a hub for all smart chains.
# Cross Chain Consensus
## **PoA Consensus Algorithm**
PoA (Proof of Authority) is a consensus approach in which a group of validators has been selected as the authorizer. Their task is to check and verify all newly added identities, validate transactions, and block blocks that are being added to the network. To ensure efficiency and security in the network, validator groups are typically kept small (-25 or smaller). The node needs to complete a mandatory process to authenticate itself in order to gain the right to generate new blocks. Authenticators are required to register in the public notary database using government-issued documents with the same identity as theirs on the platform. As a result, blocks and transactions are verified by the participant, whose identity has been verified and acts as a permission for the system.
### The advantages of the PoA consensus
Compared to other consensus approaches, PoA has the following advantages:
* **High transaction rate.**
* **No high-performance hardware is required.**
* **PoA networks** **are highly scalable compared to** **PoW blockchain**
* **Less power consumption.**
* **Low transaction fees.**
* **Increased speed of valid transactions**
* **No communication is required to reach a consensus between nodes.**
* **Network operation is independent of the number of real nodes available.**
* **The chance that a node becomes counterfeit depends on its shares and overall holdings.**
{% hint style="info" %}
Node hosting and deployment will open to the public soon. More information on node hosting will come soon. Stay tuned!
{% endhint %}
# Mint and Burn Bridge
## I. Smart Contract
***Token Mapped:*** Create a staking contract for a normal ERC20 token to realize cross-chain action.
***Mappable Token:*** Create a cross-chain eligible ERC20 staking contract for the user.
***Token Mapping:*** Mapping contracts deployed in sidechains, primarily for minting and burning tokens.
## **II. Cross-chain Assets Flow**
Mainchain –> sidechain cross-chain process
1. The user selects and deposits the token on the mainchain, which is actually staking their token to the token's staking contract.
2. The user withdraw on the sidechain, at which point the node verifies that user's deposit action through the mapping contract, and if more than 3 nodes are validated, the Token Mapping contract executes the mint operation, mints the same amount of tokens, and sends them to the user's destination address for collection.

Sidechain –> mainchain cross-chain process
1. The user selects and deposits the token on the sidechain, which is actually burning the token as the contract puts the user's token into the black hole address.
2. When the user withdraw on the mainchain, the node verifies that there is a valid deposit operation through the Token Mapping contract, and if more than 3 nodes are authenticated, the Token Mapped contract performs the unstake action and transfers the token to the user’s destination address for collection.

# Liquidity Bridge
Chainswap is launching its liquidity bridge that will serve as a cross-chain solution for mainstream tokens.

## **Why liquidity bridge?**
There are two major categories of cross-chain assets:
0\. Assets that have tokens on one chain and use mint and burn solutions to cross chain. Tokens are linked through the mapped and mapping contracts and Total supply is maintained. There is no creation of a separate token with more supply.
0\. Assets that are mainstream and have issued separate tokens on different chains. Fundamentally the tokens are not linked, but token issuers officially give credibility to the token. Tokens like ETH, USDT are in this category.
While the ChainSwap mint and burn bridge is serving the needs for category one, we see the importance of liquidity bridge and making mainstream token cross-chain live on Chainswap.
## **How does liquidity bridge work?**
The mechanism for liquidity bridge is simple to understand. Similar to Uniswap’s pair liquidity provider, the ChainSwap liquidity bridge has liquidity providers on each side of the bridge. The depth of liquidity on each chain for each asset represents the quota for cross chain on destination chain. To be a liquidity provider, you only need to stake your token on one side of the bridge (You do not need to provide liquidity on both sides of the bridge)
## **Cross chain without slippage**
Slippage occurs when there is less liquidity on one side of the bridge, so users need to bear a cost when they use it. While some existing solutions don't address this issue, ChainSwap liquidity bridge maintains 1:1 ratio and does not have slippage.
## **Liquidity providers**
Anyone can be a liquidity provider on ChainSwap. The liquidity provision requires staking of the specific tokens on one side of bridge (one chain). To be a liquidity provider, you first need to decide which chain and token you want to provide liquidity for and then stake into the liquidity pool.
The liquidity provision is less complex than providing liquidity for Uniswap, since ChainSwap only requires the staking of one token type, so it is comparable to single token staking. You can choose to provide liquidity to many tokens on many chains. Liquidity providers will benefit from the bridge fees and also ChainSwap token rewards.
Since assets are actively moving across chains, it is possible that the liquidity consumption is greater on some chains than the others, so in some cases, the liquidity providers may need to withdraw liquidity through other chains that are not the chain they initially staked. It would not affect liquidity providers’ benefit or rewards.
## **Permissioned registration of liquidity bridge asset**
Issuance of tokens on multiple chains has no linkage on the technical level, but has to be approved through official channel or human consensus. As a result, the onboarding of assets to liquidity bridge needs to be permissioned to make sure assets on each chain are real and authorized. The mint and burn bridge is open to permission-less onboarding, but not liquidity bridge.
## **Imbalance of liquidity bridge and arbitrage**
The abandonment of slippage might bring about imbalance of liquidity on the bridge. For instance, liquidity of USDT on Binance Smart Chain might be drained faster than ETH due to high demand of USDT usage on BSC. In this case, BSC will have less liquidity to withdraw for users. To balance the liquidity on the bridge, we promote arbitrage opportunities to incentivize people to balance the bridge.
The arbitrage is simply moving asset cross-chain with a timed withdraw. Arbitrageurs will bring bridge to a balance point.
# Chainswap Solana Initiative
ERC20 -- SPL token bridge live soon!
(Working with Wormhole on this)
It is **leaderless** — all guardians perform the same computation upon observing an on-chain event, and sign a so-called **Validator Action Approval** (**VAA**). If a 2/3+ majority of all guardian nodes have observed and signed the same event using their individual keys, then it is automatically considered valid by all Wormhole contracts on all chains and triggers a mint/burn.
All guardians have **equal weight** — there’s no Wormhole staking token. PoS economics are very hard to get right, and can easily get misaligned. With Wormhole being closely coupled to Solana, we believe that a PoA network that “borrows” identities and trust from the main chain is much less likely to be subtly broken or have misaligned incentives than a separate PoS chain.
We have successfully avoided the use of bleeding edge cryptography — instead, we use a plain **M/N multisig** scheme using secp256k1 signatures. It’s really quite boring, and in cryptography, boring is exactly what one wants!
Consensus is established asynchronously using a **gossip network**. Once a VAA has been signed by a sufficient number of nodes, it is posted to the Solana chain for **data availability**. It is then either immediately executed, or, for VAAs to be executed on Ethereum, retrieved by the user who triggered the transaction and submitted to Ethereum — and the fee paid for — by themselves (this happens transparently when using the Wormhole wallet). The **fee for Solana transactions** is paid for by the requestor by paying a slightly higher rent on the account that is created when requesting a token lock or burn.
VAAs are always generated in response to an on-chain event. The only exception are **guardian set changes** — nodes can agree on a new guardian set by submitting a special VAA that specifies the new guardian set, which has been established by an off-chain governance mechanism.
### Alternatives to a m/n multisig scheme
Fast and efficient off-chain signature aggregation is a very active field of research, and before settling with m/n multisig, we investigated a number of alternatives to see if any of them could be more efficient:
* [**One-Round Threshold ECDSA with Identifiable Abort**](https://eprint.iacr.org/2020/540.pdf) by Gennaro and Goldfeder, 2020 (informally known as “the GG20 paper”). It improves upon a [previous](https://eprint.iacr.org/2019/114.pdf) threshold ECDSA scheme by the same authors. It’s a very recent, very exciting bleeding-edge scheme that uses homomorphic encryption, zero-knowledge proofs, and verifiable secret sharing to jointly generate a single ECDSA signature using a private key split across many different key holders (a “**threshold signature**”). GG20 and/or its precedessor are used by [THORchain](https://medium.com/thorchain/thorchain-publish-tss-whitepapers-d3ea66913721), [Binance Chain](https://www.binance.com/en/blog/398654406137536512/Binance-OpenSources-Threshold-Signature-Scheme-Library) and others. Is is very valuable when bridging to a “dumb” chain like Bitcoin, which only support ECDSA signatures. For our use case, which has fewer such constraints, it’s **unnecessarily complex**, very slow, and computational complexity increases non-linearly with number of signers.
* [**Schnorr Threshold Signatures**, first introduced by Stinson and Strobl, 2001](https://dl.acm.org/doi/10.5555/646038.678297). Schnorr signatures are cheap to verify on Ethereum and Schnorr threshold signatures are well-studied, with multiple high-quality reference implementations (here’s a [good intro by Chainlink](https://blog.chain.link/threshold-signatures-in-chainlink/)). However, a **distributed key generation scheme** is required both for the initial node key generation as well as for generating each joint signature’s individual nonce, and there, the situation looks pretty bleak. The most commonly used Joint-Feldman DKG scheme requires three rounds, is not provably safe for concurrent rounds and [can be biased](https://onlinelibrary.wiley.com/doi/full/10.1002/sec.1651). A newer, improved schema solves the bias, but at the expense of even more rounds. The bias wasn’t necessarily a deal-breaker, but **implementation complexity and latency** of interactive nonce generation made us drop this, too.
* [**FROST: Flexible Round-Optimized Schnorr Threshold Signatures**](https://eprint.iacr.org/2020/852.pdf) by Komlo, 2020. FROST was invented by ZCash and improves upon existing Schnorr threshold signature schemes by optimizing the number of rounds required to produce a single signature. This is **early stage research** and no implementation or audit exists as of now — but we’ll keep an eye on it.
* [**BLS threshold signatures**](https://crypto.stanford.edu/~dabo/pubs/papers/BLSmultisig.html) on a BN256 curve. It’s very cheap to generate and verify threshold and aggregate signatures using BLS, and the signing process is non-interactive. However, threshold BLS signatures still require an **interactive distributed key generation step** to initially generate the node keys, which needs to occur each time the guardian set changes. This is subject to the limitations discussed above — JF-DKG can be biased, New-DKG is even more complex, and we’d have to handle abort scenarios and other incentivization issues. Plus, we’re uneasy about the recent attacks on BN256 that downgraded its security to 100bit.
* **BLS aggregate signatures** on BN256 are much easier — you don’t have to generate a joint key, instead, one can literally just sum up all individual signatures. But, the signature is **very expensive to verify on ETH** since the public keys of all nodes have to be loaded in the contract.
The most promising choice beyond m/n signatures are BLS threshold signatures. The main concern with BLS threshold signatures can be solved by implementing New-DKG, which would be feasible to do for future iterations of Wormhole. BLS threshold signatures are cheaper than m/n signatures for guardian sets with more than 15 members.
The main design constraint of Wormhole are indeed **fees on Ethereum** — gas prices in the 100–200 Gwei range are considered cheap these days, with prices occassionally spiking above 500 Gwei!
# Chainswap Intermediary Chain
(Coming in the future)
{% hint style="info" %}
More details to be released
{% endhint %}
# Chainswap Application
A family of Applications (Coming in the future)
{% hint style="info" %}
Chainswap will introduce a series of applications powered by TOKEN. Sectors include defi, explorer, tools, wallets etc.
{% endhint %}
# ChainSwap’s Cross-chain Aggregator
A cross-chain aggregator solution, with one interface it will be possible to find the bridge offering the best price with least slippage.
## Current Challenges
Imagine that you want to transfer Token A from ETH to BSC with a decentralized cross-chain bridge. Currently there are a few challenges:
* You need to research which bridge supports the token on both chains
* Which bridge provides the best deal with the lowest slippage and transaction fee, on top of other information such as estimated bridge duration
In order to do that, you have to spend time to search all the currently offered bridge solutions to find the one suits your needs the best. It takes time and it’s currently a lot of work. Some might choose the first they find which isn’t always the best.
Currently there are various cross-chain solutions, protocols and implementations on the market and each has their own strength. However, as they do not have a unified standard or interface, users always have difficulties in finding the best deal.
## Market Analysis
According to Dune Analytics, the current combined TVL of Ethereum bridges is $24.51 billion as of Nov. 23, 2021, jumping up by 100% from only 2 months ago with the expansion of DeFi ecosystem. This data tracks the 17 leading Ethereum bridges and is demonstrating an ever-growing trend.
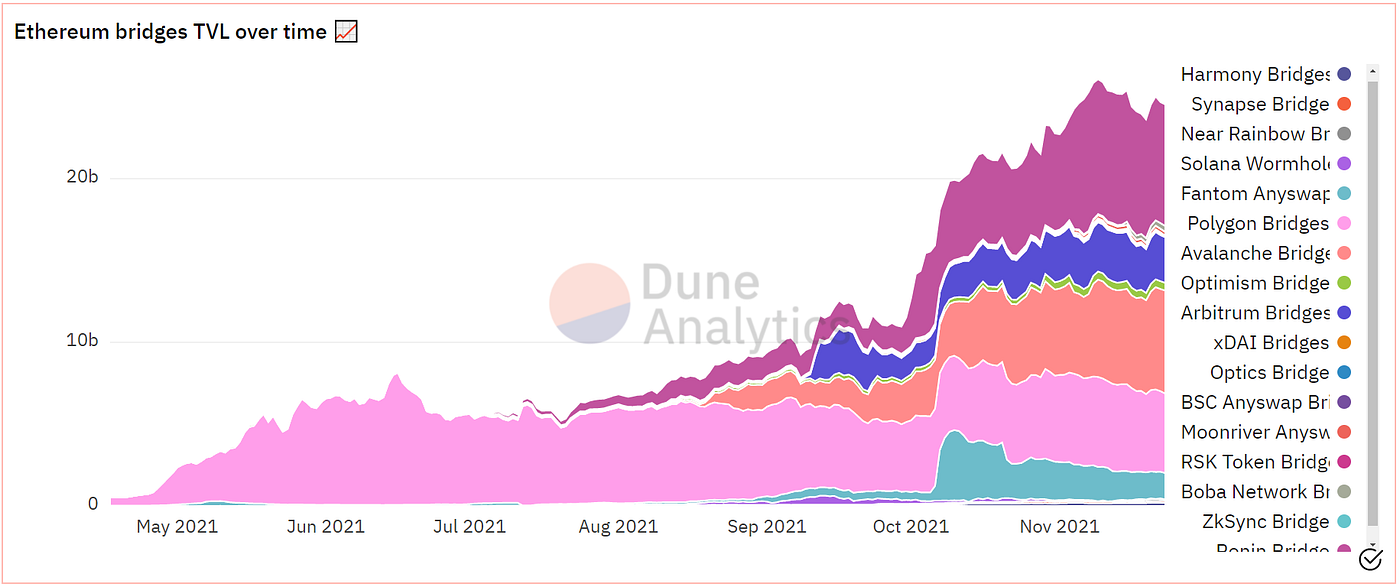
There are a number of main cross-chain solutions currently available on the market, including Cambridge, Hop, Binance Bridge, Terra Bridge, Anyswap, Allbridge, Renbridge, Xpollinate, Polynetwork, etc. More cross-chain projects are expected to emerge in the future.
Different projects adopt different approaches. We have centralized ones V.S. decentralized ones; cryptographic algorithms V.S. trusted devices; multiple steps V.S. simple one-click.
Each cross-chain solution has its pros and cons. But in terms of the overall structure, all of them are based on these five elements: source chain, source token, destination chain, destination token, and sender. When it comes to EVM-based cross-chain solutions, we also have Source Mapping contract and Destination Mapping contract.
## Cross-Chain Aggregator Solution
ChainSwap’s ultimate goal is to create an aggregator platform that integrates all cross-chain solutions and allows users to enjoy the margin of these projects combined through the unified interface that we provide, thus making the cross-chain experience more convenient and effective.
The ultimate goal takes many steps and the initial one is to integrate three cross-chain solutions: AnySwap, PolyNetwork and Wormhole. AnySwap and PolyNetwork are based on EVM with many similarities in their foundations. Wormhole is built upon Solana and will be integrated as the last one in the initial stage.
The entire solution will be presented in the form of one interface. Users first select the Source token they wish to transfer cross-chain, then the source chain, destination chain and enter the amount they wish to transfer. The platform then presents the user with a list of all cross-chain projects that can provide this service. Once selected, the cross-chain transfer can be done with one click.
# Cross Chain Asset Swap
How to use ChainSwap to exchange cross-chain asset
**How to use ChainSwap to exchange cross-chain asset**
1\. Visit ChainSwap at
2\. Connect your wallet, e.g., MetaMask ...
3\. Select "From" network, e.g., Ethereum, BSC, HECO ... *( "From" network is your connected network)*
4\. Select asset and enter the swap amount.

5\. Select destination network.

6\. Confirm swap amount and click deposit.

7\. Confirm transaction.

8\. Submit your transaction with extension wallet. You can track the progress here↓

9\. Once transaction confirmed, click withdraw on destination network.

10\. Confirm withdraw and submit transaction with extension wallet.

11\. Your asset will arrive to your destination wallet shortly.

# BSC <-> ETH
Crossing between BSC and ETH on ChainSwap.
## **Crossing from BSC to ETH**
1\. Visit ChainSwap at
2\. Connect your wallet, e.g., MetaMask ...
3\. Select and connect your "From" network: Binance Smart Chain (BSC) through your wallet.
4\. Select asset and enter the swap amount.

5\. Select destination network: ETH

6\. Confirm swap amount and click deposit.

7\. Confirm transaction.

8\. Submit your transaction with extension wallet. You can track the progress here↓

9\. Once transaction confirmed, click withdraw on destination network.

10\. Make sure to switch to destination network for withdraw.

11\. Confirm withdraw and submit transaction with extension wallet.

12\. Once confirmed, your asset will arrive to your destination wallet shortly.
## **Crossing from ETH to BSC**
1\. Visit ChainSwap at
2\. Connect your wallet, e.g., MetaMask ...
3\. Select and connect your "From" network: Ethereum Mainnet (ETH) through your wallet.
4\. Select asset and enter the swap amount.

5\. Select destination network: BSC

6\. Confirm swap amount and click deposit.

7\. Confirm transaction.

8\. Submit your transaction with extension wallet. You can track the progress here↓

9\. Once transaction confirmed, click withdraw on destination network.

10\. Make sure to switch to destination network for withdraw.

11\. Confirm withdraw and submit transaction with extension wallet.

12\. Once confirmed, your asset will arrive to your destination wallet shortly.
# BSC <-> HECO
Crossing between BSC and HECO on ChainSwap.
## **Crossing from BSC to HECO**
1\. Visit ChainSwap at
2\. Connect your wallet, e.g., MetaMask ...
3\. Select and connect your "From" network: Binance Smart Chain (BSC) through your wallet.
4\. Select asset and enter the swap amount.

5\. Select destination network: HECO

6\. Confirm swap amount and click deposit.

7\. Confirm transaction.

8\. Submit your transaction with extension wallet. You can track the progress here↓

9\. Once transaction confirmed, click withdraw on destination network.

10\. Make sure to switch to destination network for withdraw.

11\. Confirm withdraw and submit transaction with extension wallet.

12\. Once confirmed, your asset will arrive to your destination wallet shortly.
## **Crossing from HECO to BSC**
1\. Visit ChainSwap at
2\. Connect your wallet, e.g., MetaMask ...
3\. Select and connect your "From" network: HECO Mainnet (HECO) through your wallet.
4\. Select asset and enter the swap amount.

5\. Select destination network: BSC

6\. Confirm swap amount and click deposit.

7\. Confirm transaction.

8\. Submit your transaction with extension wallet. You can track the progress here↓

9\. Once transaction confirmed, click withdraw on destination network.

10\. Make sure to switch to destination network for withdraw.

11\. Confirm withdraw and submit transaction with extension wallet.

12\. Once confirmed, your asset will arrive to your destination wallet shortly.
# BSC <-> OKEx
Crossing between BSC and OKEx on ChainSwap.
## **Crossing from BSC to OKEx**
1\. Visit ChainSwap at
2\. Connect your wallet, e.g., MetaMask ...
3\. Select and connect your "From" network: Binance Smart Chain (BSC) through your wallet.
4\. Select asset and enter the swap amount.

5\. Select destination network: OKEx

6\. Confirm swap amount and click deposit.

7\. Confirm transaction.

8\. Submit your transaction with extension wallet. You can track the progress here↓

9\. Once transaction confirmed, click withdraw on destination network.

10\. Make sure to switch to destination network for withdraw.

11\. Confirm withdraw and submit transaction with extension wallet.

12\. Once confirmed, your asset will arrive to your destination wallet shortly.
## **Crossing from OKEx to BSC**
1\. Visit ChainSwap at
2\. Connect your wallet, e.g., MetaMask ...
3\. Select and connect your "From" network: OKExChain (OKEx) through your wallet.
4\. Select asset and enter the swap amount.

5\. Select destination network: BSC

6\. Confirm swap amount and click deposit.

7\. Confirm transaction.

8\. Submit your transaction with extension wallet. You can track the progress here↓

9\. Once transaction confirmed, click withdraw on destination network.

10\. Make sure to switch to destination network for withdraw.

11\. Confirm withdraw and submit transaction with extension wallet.

12\. Once confirmed, your asset will arrive to your destination wallet shortly.
# ETH <-> HECO
Crossing between ETH and HECO on ChainSwap.
## **Crossing from ETH to HECO**
1\. Visit ChainSwap at
2\. Connect your wallet, e.g., MetaMask ...
3\. Select and connect your "From" network: Ethereum Mainnet (ETH) through your wallet.
4\. Select asset and enter the swap amount.

5\. Select destination network: HECO

6\. Confirm swap amount and click deposit.

7\. Confirm transaction.

8\. Submit your transaction with extension wallet. You can track the progress here↓

9\. Once transaction confirmed, click withdraw on destination network.
*9.1 In any case you lost your progress, check your **claim list**.*

9.2 Select swapped asset.

9.3 Claim your asset for withdraw.

10\. Make sure to switch to destination network for withdraw.
11\. Confirm withdraw and submit transaction with extension wallet.

12\. Once confirmed, your asset will arrive to your destination wallet shortly.
## **Crossing from HECO to ETH**
1\. Visit ChainSwap at
2\. Connect your wallet, e.g., MetaMask ...
3\. Select and connect your "From" network: HECO Mainnet (HECO) through your wallet.
4\. Select asset and enter the swap amount.

5\. Select destination network: ETH

6\. Confirm swap amount and click deposit.

7\. Confirm transaction.

8\. Submit your transaction with extension wallet. You can track the progress here↓

9\. Once transaction confirmed, click withdraw on destination network.

10\. Make sure to switch to destination network for withdraw.

11\. Confirm withdraw and submit transaction with extension wallet.

12\. Once confirmed, your asset will arrive to your destination wallet shortly.
##
# ETH <-> OKEx
Crossing between ETH and OKEx on ChainSwap.
## **Crossing from ETH to** OKEx
1\. Visit ChainSwap at
2\. Connect your wallet, e.g., MetaMask ...
3\. Select and connect your "From" network: Ethereum Mainnet (ETH) through your wallet.
4\. Select asset and enter the swap amount.

5\. Select destination network: OKEx

6\. Confirm swap amount and click deposit.

7\. Confirm transaction.

8\. Submit your transaction with extension wallet. You can track the progress here↓

9\. Once transaction confirmed, click withdraw on destination network.

10\. Make sure to switch to destination network for withdraw.
11\. Confirm withdraw and submit transaction with extension wallet.

12\. Once confirmed, your asset will arrive to your destination wallet shortly.
## **Crossing from** OKEx **to ETH**
1\. Visit ChainSwap at
2\. Connect your wallet, e.g., MetaMask ...
3\. Select and connect your "From" network: OKExChain (OKEx) through your wallet.
4\. Select asset and enter the swap amount.

5\. Select destination network: ETH

6\. Confirm swap amount and click deposit.

7\. Confirm transaction.

8\. Submit your transaction with extension wallet. You can track the progress here↓

9\. Once transaction confirmed, click withdraw on destination network.

10\. Make sure to switch to destination network for withdraw.

11\. Confirm withdraw and submit transaction with extension wallet.
12\. Once confirmed, your asset will arrive to your destination wallet shortly.
##
# HECO <-> OKEx
Crossing between HECO and OKEx on ChainSwap.
## **Crossing from HECO to OKEx**
1\. Visit ChainSwap at
2\. Connect your wallet, e.g., MetaMask ...
3\. Select and connect your "From" network: HECO Mainnet (HECO) through your wallet.
4\. Select asset and enter the swap amount.

5\. Select destination network: OKEx

6\. Confirm swap amount and click deposit.

7\. Confirm transaction.

8\. Submit your transaction with extension wallet. You can track the progress here↓

9\. Once transaction confirmed, click withdraw on destination network.

10\. Make sure to switch to destination network for withdraw.
11\. Confirm withdraw and submit transaction with extension wallet.

12\. Once confirmed, your asset will arrive to your destination wallet shortly.
## **Crossing from** OKEx **to HECO**
1\. Visit ChainSwap at
2\. Connect your wallet, e.g., MetaMask ...
3\. Select and connect your "From" network: OKExChain (OKEx) through your wallet.
4\. Select asset and enter the swap amount.

5\. Select destination network: HECO

6\. Confirm swap amount and click deposit.

7\. Confirm transaction.

8\. Submit your transaction with extension wallet. You can track the progress here↓

9\. Once transaction confirmed, click withdraw on destination network.

10\. Make sure to switch to destination network for withdraw.

11\. Confirm withdraw and submit transaction with extension wallet.

12\. Once confirmed, your asset will arrive to your destination wallet shortly.
# Asset Deployment
Our goal is to provide a cross-chain environment that mimics the experience of Uniswap. The current manual token onboarding process for ChainSwap is not suited for mass adoption. We are implementing permissionless token listing for ChainSwap, making it seamless to list any token just like on Uniswap.
**Anyone can cross-chain their token contracts through ChainSwap’s permissionless bridge system. This feature is suitable for three cases:**
* You already have a token issued on one chain such as Ethereum, and you have not issued your tokens on other chains.
* You already have a token issued on one chain such as Ethereum, and you have not issued your tokens on other chains. You want your token contract address to be the same on all chains. *(Coming Soon)*
* You have not issued your tokens and you are looking to issue a new token. *(Coming Soon)*
## Step by step how to deploy your asset and make it cross-chain
1\. Visit ChainSwap to deploy at
2\. Connect MetaMask or other wallets with WalletConnect.

3\. Enter token's contract address and choose the your token network's Chain ID, e.g., Ethereum, BSC, HECO ......

4\. Confirm token information,enter the nonce value, click to deploy.

5\. Submit transaction through your wallet and wait for transaction confirmation.
6\. After successfully deploying on mainchain, continue to next step.

7\. Choose the Chain ID your token wish to be mapped to, switch to the corresponding network in your wallet, then click deploy.

8.Submit transaction through your wallet, wait for the confirmation and click next.

9\. Click "Deploy" Submit transaction through your wallet and wait for transaction confirmation.

10\. Congratulations, your token has been deployed on your target chain, you can now with ChainSwap for cross-chain transactions!
11\. Go to "Swap" on the top left corner.

12\. Select your token.

13\. Enter your token contract address, click to import.

\
**Fee rate:**
The permission-less deployment on ChainSwap charges a fee of 0.3ETH for each token. (Break down: The mapping contract deployment fee is 0.1ETH and the factory contract deployment fee is 0.2 ETH). The fees will go to the contract which are managed by the ChainSwap Dao. Fees will be used to buy back TOKEN from the market.
**Whitelisting:**
When you finish your deployment process, you can bridge swap your token through ChainSwap portal. Users will need to search for your token contract to be able to find your token. If you want to facilitate the process and add your token logo, you can apply for [whitelisting](https://w5h8tot8xqe.typeform.com/to/jw96fQsB) for your token, and ChainSwap team will verify and add it to the whitelist.
**Token information:**
Once you deploy your token, you can search your token information through . Your token contract addresses on different chains will be displayed in each token profile.
# Asset Whitelisting
Note: You need to deploy your asset on ChainSwap bridge before applying for white listing.
The Chainswap team is currently maintaining the token list for the whitelisted asset. Whitelisted assets will be shown in default list of the swap interface.
To apply for the Chainswap whitelist, fill in the following form and a support will reach out to you.
{% embed url="" %}
# Search for Nonce
In Ethereum, every transaction has a nonce. The nonce is the number of transactions sent from a given address. Each time you send a transaction, the nonce value increases by 1. To find which nonce you deployed your token contract address from:
1\) Find the original transaction hash of your token contract deployment and open it in Etherscan.


2\) Click on "Click to see more"

3\) Your Nonce of the token creation transaction will be displayed in the view more

# Wallet Connections
# Binance Smart Chain
Connecting MetaMask to Binance Smart Chain
## How to set up BSC in MetaMask
## Installing and Setting up MetaMask
Network:BSC mainnet
MetaMask can be downloaded on Chrome and Firefox, or on iOS and Android if you’re a mobile user. For the purposes of this tutorial, we’ll use the Firefox version, but the instructions will be more or less the same for every platform.Firstly, you’ll want to head over to the MetaMask [Download page](https://metamask.io/download.html). From there, select whichever platform you’re using, and follow the steps to install it on your device. Easy!Next, follow along with the setup specified by the app. Go ahead and click Create a Wallet. Write down the backup [seed phrase](https://academy.binance.com/en/glossary/seed-phrase) somewhere secret (preferably not on an Internet-connected device). Without this phrase, your funds can’t be recovered if your device is damaged or lost. Confirm that you’ve written them down on the next page.
RPC URL:
And that’s it! You should now see your wallet, ready to send and receive funds.

## Configuring the Wallet
You might notice straight away that we’re still dealing with an [Ethereum](https://academy.binance.com/en/articles/what-is-ethereum) wallet. At best, this won’t work with Binance Smart Chain DApps. At worst, **you could lose funds by sending them to addresses you can’t actually use**.Let’s change that. We want to access the **Settings** to point the wallet towards Binance Smart Chain nodes.
Symbol:BNB

On the Settings page, we want to locate the Networks menu.
Block Explorer (Optional):

We want to click **Add Network** in the top-right corner to **manually add the Binance Smart Chain** one – it doesn’t come packaged with MetaMask. It’s important to note that there are two networks we can use here: the testnet or the mainnet. Below are the parameters to fill in for each.
#### Mainnet (This is the one you are probably looking for)
**Network Name:** Smart Chain
1\. Open MetaMask
**New RPC URL:**
2\. Go to Settings
**ChainID:** 56
3\. Go to Networks, add network using the information above.
**Symbol:** BNB
**Block Explorer URL:**
# Huobi Eco Chain
## How to set up HECO in MetaMask
Network:HECO mainnet
#### 1. Config Metamask for OKExChain Mainnet
* **NetWork Name**: HECO Mainnet
* **RPC URL**:
*
* **Chain ID**: 128
* **Currency Symbol**: HT
* **Block Explorer URL**:

#### 2. Create a new account or import an existing account

1\. Open MetaMask
2\. Go to Settings
3\. Go to Networks, add network using the information above.
# OK Chain
#### 1. Config Metamask for OKExChain Mainnet
* **NetWork Name**: OKExChain Mainnet
* **RPC URL**:
*
* **Chain ID**: 66
* **Currency Symbol**: OKT
* **Block Explorer URL**:

#### 2. Create a new account or import an existing account

# Cross-chain NFT Bridge Tutorial
Users would be able to bridge their NFTs to other chains without any approval/permission/support from the NFT issuer or the destination chain.
**Step 1 — See if your NFT is already in your inventory**
After you have entered our NFT Bridge page, you can choose **\[Select From Inventory]** to see if your NFTs are already there. If they are not, you can choose **\[Import Manually]**.

**Step 2 — Import your NFTs (if not already in inventory)**
Copy and paste manually the **\[Token Contract Address]** and **\[Token ID]** and click **\[Import]**. It should say **\[Import Success]** if it is successfully imported.

**Step 3 — Deposit your NFT**
Go back to your **\[Inventory]** and choose the NFT you wish to bridge by selecting it.

Select the **\[To]** chain and select your desired destination chain. We have selected BSC in the example below. Then click **\[Deposit in ETH Chain]**. We are bridging from ETH chain in our example below. Then \[Confirm] your deposit and \[Approve] the transaction on your wallet.

**Step 4— Withdraw your NFT**
After it is successfully deposited, you should see **\[Withdraw from BSC Chain]** (we are using BSC as an example below). Click on the said button.

At this point, the website should prompt you to switch the Network of your Wallet from the existing chain (ETH in this example) to your destination chain (BSC in this example). Please click **\[Confirm]** to switch to your destination chain and **\[Approve]** the switch on your **\[Wallet]**.
If the website does not prompt the chain switch, you should see the below message, you will then need to manually switch the Network on your Wallet from existing chain (ETH in this example) to your destination chain (BSC in this example).

It is very important that you make sure the Network chain you switched to and the according Wallet address is where you wish to receive your bridged NFT. Then click **\[Confirm]** and you should see **\[Withdrawing]** as below. Then approve the transaction on your Wallet accordingly.

**Step 5 — Check if your NFT is there**
After the transaction is approved, you should see your bridged NFT in your **\[Inventory]**. Remember to choose the destination chain in the drop down menu in your **\[Inventory]** to see it (BSC in this example below). And congratulations you are all done!

You can also find your bridging history in the **\[Activity]** tab (see below).

# Cross-chain Aggregator Tutorial
A cross-chain aggregator solution, with one interface it will be possible to find the bridge offering the best price with least slippage.
1\. Before starting, connect your wallet first.
2\. Select an asset that you want to cross.

3\. Then select your source chain and target chain of this journey. After this, the available bridges will be automatically displayed below.

4\. Select the bridge you want to use, the cost and limitations on the amount are shown below. Then switch your network to the right one.

5\. Finally enter your cross-chain amount, you can see the destination displayed below. Click on 'Cross Chain'.

6\. After confirmation in your wallet, this cross-chain is done, and the arrival time of the tokens depends on the network congestion.

# Token Economics
ChainSwap has a native platform token called Chainswap.com Governance Token (ticker: TOKEN). The platform token facilitates platform operation, utility capture and value realization. TOKEN has no monetary value. TOKEN incorporates economic and game theoretical designs to boost platform utility.
## Features of TOKEN
### Governance Voting
Each TOKEN represents one vote in the decision making process of the ChainSwap hub. The more TOKEN held in ones wallet, the higher voting power and influence they have make on proposals.
### ChainSwap Consensus Staking
Consensus Node staking for ChainSwap nodes. Building and securing ChainSwap's cross-chains system.
### The Protocol Fee
The ChainSwap bridge has an embedded fee system. The fees are charged to client for bridging the asset. Fees are collected and used for purchasing back TOKEN.
### The Liquidity Provision Fee
The liquidity bridge (an upcoming bridging solution) allows liquidity providers to earn fees from providing liquidity on one end or both ends of the bridge. Liquidity providers will earn liquidity provision fees from the clients. Part of the fees are used to buy back TOKEN and reward liquidity providers.
### ChainSwap Hub TOKEN
ChainSwap will develop an intermediate chain that brings about native cross-chain features for DApps deploying in the hub. The TOKEN will be used as the native token for the intermediate chain.
{% hint style="info" %}
More utility will be added and adjusted along the road. Token economics is a dynamic subject that evolves with the project development and product usage.
{% endhint %}
###
# Liquidity Bridge Economic and Arbitrage Model
This article aims to explain the liquidity bridge token economics and cover the cross-chain liquidity arbitrage system for major assets.
ChainSwap Liquidity Bridge is a dynamic feature that will allow the bridging of mainstream assets (USDT, USDC, DAI..) across all major chains supported by ChainSwap.
## Summary
* Users will be able to stake their major assets such as USDT as **single side LP** on ChainSwap and earn rewards.
* Dynamic arbitrage system where LPs are able to arbitrage their liquidity and recieve rewards on a FCFS basis
* **LPs are rewarded in TOKEN**
* **No slippage, no lockup on staked assets**
* **Liquidity bridge fee is set at 0.08% of the asset and a base 0.005 ETH fee**
## Token economics
The economical system of the ChainSwap Liquidity Bridge is as follows.
* There is a transaction fee for swapping major assets such as ETH/USDT/USDC. **This fee is set at 0.08% of the asset and a base 0.005 ETH fee**
* Fees are used to buyback TOKEN and locked into reward vault DAO.
* **LPs that provide major asset liquidity earn rewards in form of TOKEN which are a reward mix of protocol rewards pool and the reward DAO pool.**
* LPs will have the opportunity to arbitrage their assets across chains. As an example lets assume there is $5M worth of USDT staked on ETH but only $500k on BSC. LPs will be able to arbitrage their staked LP to chains with lagging liquidity ensuring best yield.
* Additionally users who hold TOKEN will be able to stake it into respective pools earning fee rewards. The staking fee reward is set to be lower than the fee reward for LPs.
* There is no lockups on liquidity or staked assets, LPs and users can deposit and withdraw at any given time.
* TOKEN rewards are dynamic for both LPs and TOKEN stakers, depending on TOKEN price.
## The launch
Major asset liquidity bridge will be lanching with USDT only. With time we plan to launch and implement additional major assets such as ETH, USDC, ect.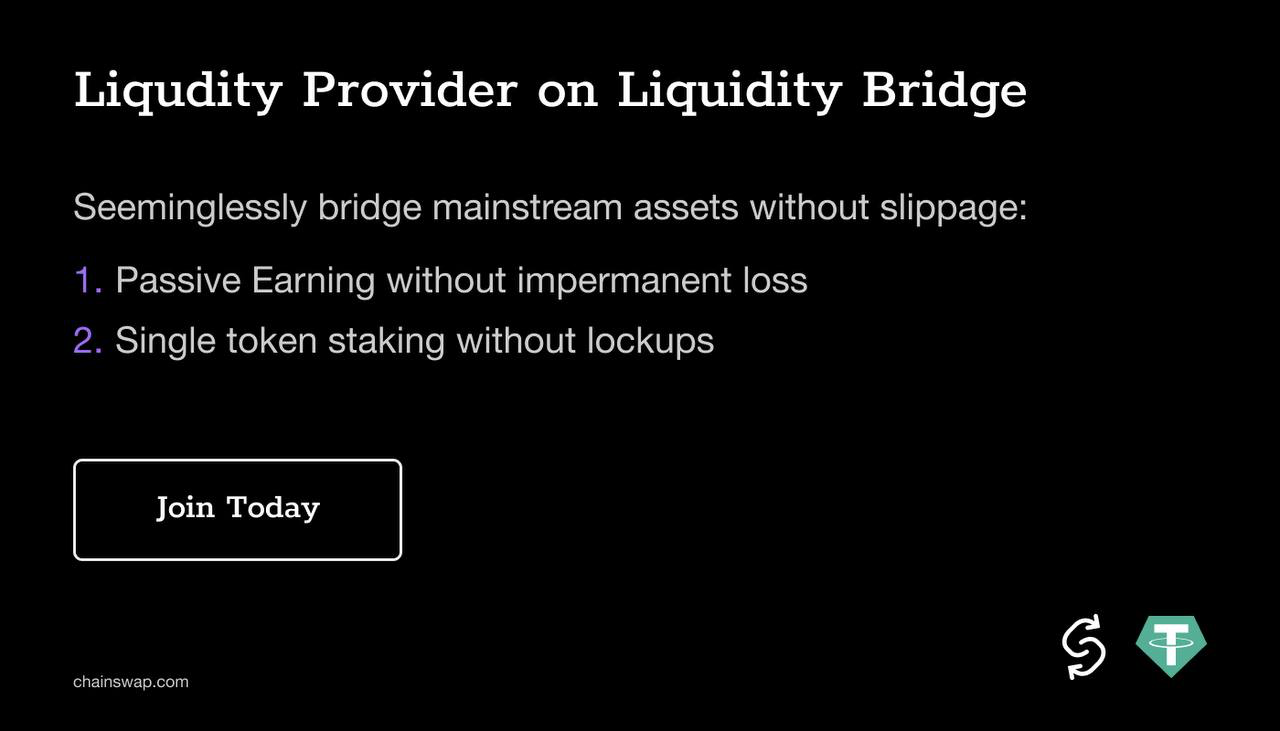
Users will be able to go to [chainswap.exchange/liquidity](https://www.chainswap.exchange/liquidity) and stake their USDT as a single side LP. To be a liquidity provider, you first need to decide which chain and token you want to provide liquidity for and then stake into the liquidity pool. LPs will be rewarded in form of TOKEN. Rewards are dynamic depending on price of TOKEN.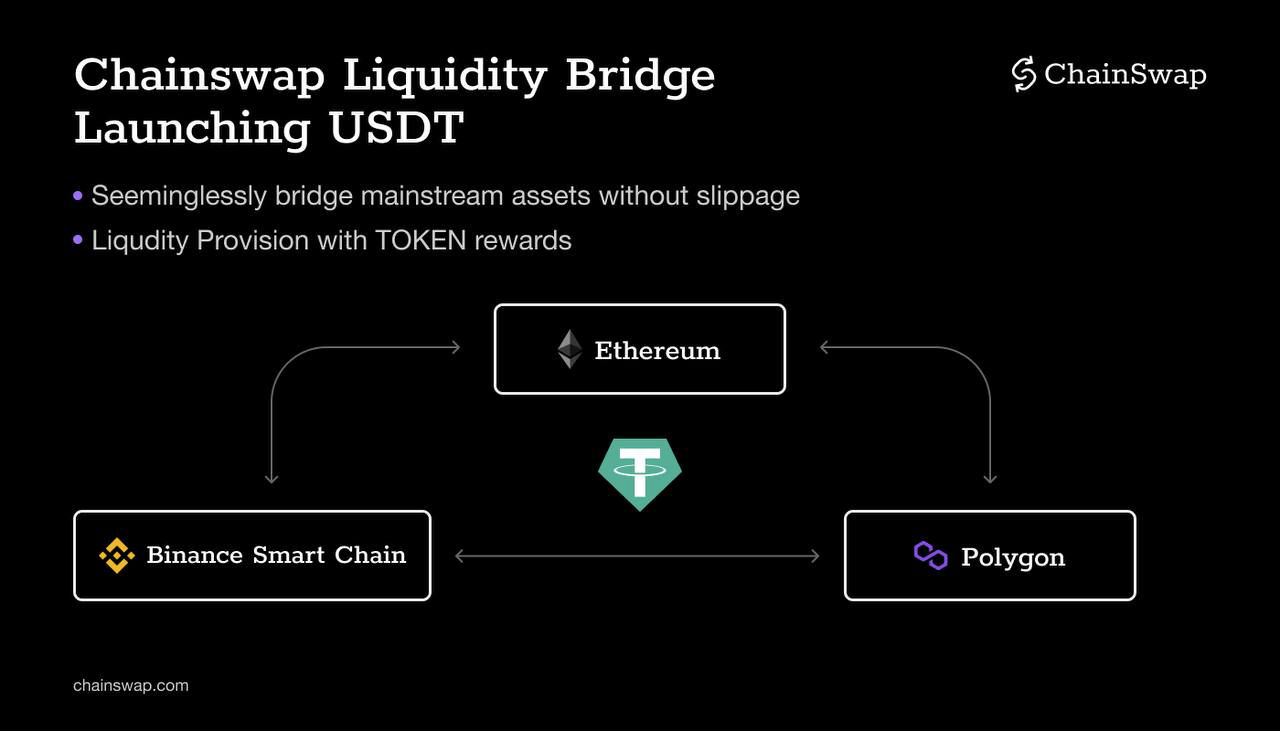
Bridge users that want to swap major assets across chains can do so without slippage. 100,000 USDT swapped from ETH to BSC will still equal 100,000 USDT (- fees) given enough liquidity on both chains.
Initially the pools won’t be capped, if the supply of staked USDT is much more than the demand of the bridge the team might consider capping the pools at at given amount.
## Arbitraging liquidity across chains
Arbitrage opportunities arise when an user wants to swap more assets than there is liquidity across chains. LP will be able to see arbitrage opportunity notifications on the manage liquidity page.
By clicking on “Arbitrage Now”, LP providers get sent to a page where they can instantly arbitrage their liquidity to complete a pending transaction and see the estimated reward for the arbitrage.
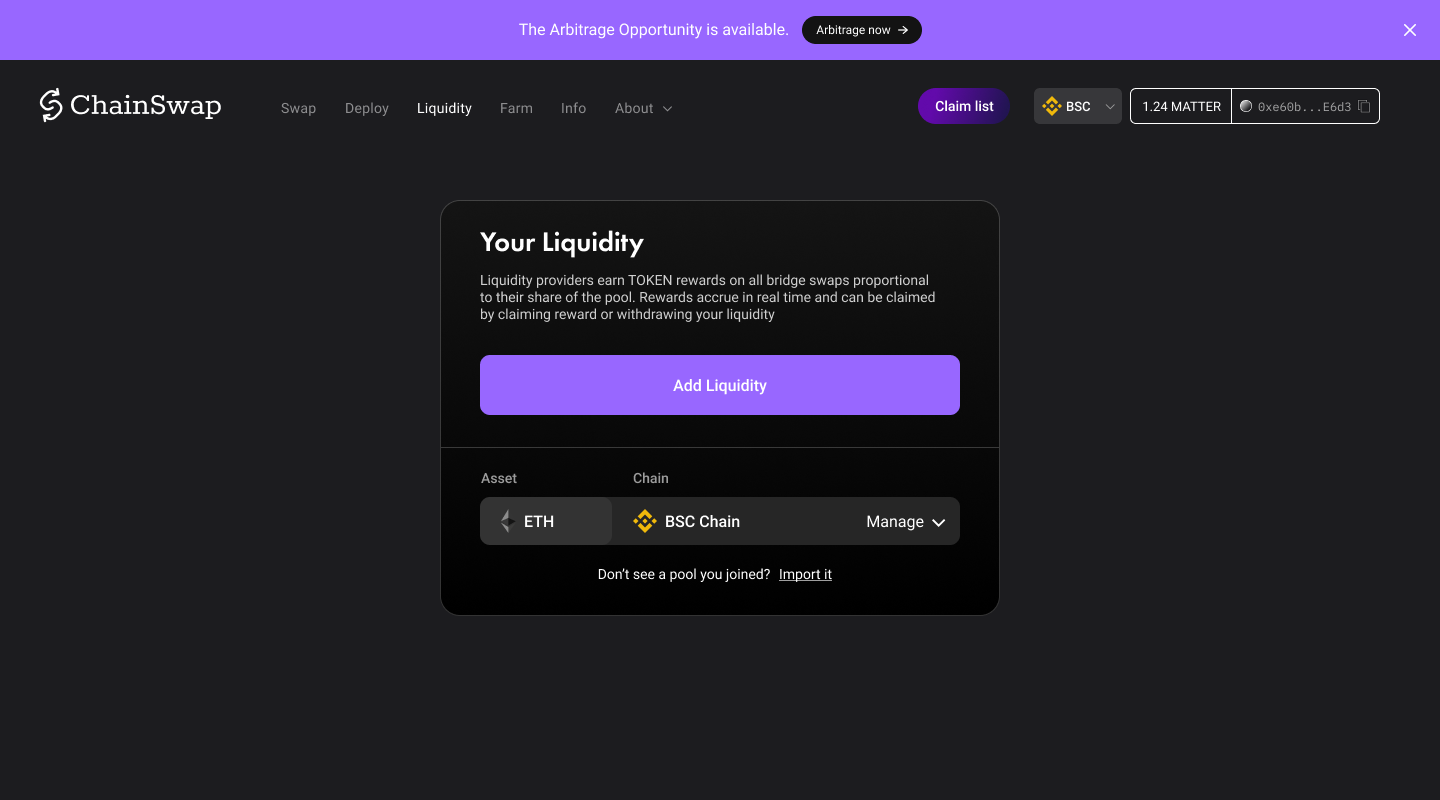
> The ChainSwap team plans to implement automatic arbitrage and arbitrage bots in the upcoming future.
{% embed url="" %}
# Protocol Fee
## Bridge Swap
| Bridge Type | Fee Structure |
| -------------------- | ------------------------------------------------------------------------------ |
| Liquidity Bridge | Base fee (0.005ETH per swap, 0.005 BNB per swap) + 0.08% of the bridged tokens |
| Mint and burn Bridge | Base fee (0.005ETH per swap, 0.005 BNB per swap) |
Chainswap is not one of the "no fee" exchanges, but charge 0.08% per transaction for makers on the liquidity bridge. Regardless of whether you compare to DEXs or centralized exchanges, these fees are above industry average. In addition, Chainswap charges a base fee of 0.005ETH per bridge transaction to prevent abuse of bridge.
{% hint style="info" %}
Liquidity Bridge e.g. I swap 10000 USDT from ETH to BSC; I need to pay 10000\*0.08%=8 USDT and 0.005 ETH.
{% endhint %}
{% hint style="info" %}
Mint and Burn Bridge e.g. I swap 10000 TOKEN from ETH to BSC; I need to pay 0.005 ETH
{% endhint %}
## Bridge Deployment
The permission-less deployment on ChainSwap charges a fee of 0.3ETH for each token. (Break down: The mapping contract deployment fee is 0.1ETH and the factory contract deployment fee is 0.2 ETH).
## Where does the fee go?
The fees will go to the contract which are managed by the ChainSwap Dao. Fees will be used to buy back TOKEN from the market. We will make announcement with prove of purchase during each period of TOKEN buy back.
# Contracts
Proxy Factory Contract :
Ethereum mainnet: 0xBF515ff38D55737C56D62E8B6a8eea322Ec38Aa5
BSC: 0xBF515ff38D55737C56D62E8B6a8eea322Ec38Aa5
HECO: 0xBF515ff38D55737C56D62E8B6a8eea322Ec38Aa5
# Github Repository
{% embed url="" %}
# Join Community
Join our community and be a part of Chainswap family
**Email:**
**Twitter:**
**Medium:**
**Telegram:**
**Github:**
# Support
You can email to for technical issues and we will get back to you as soon as we can.